Connections
A connection is the link established between Qrvey and your external data source:
- Database.
- Data warehouse.
- CSV or JSON files.
- Cloud storage service like AWS.
- Incoming data from REST APIs.
- Other system that stores data.
Connections allow Qrvey to access and retrieve data from these external sources, establishing a secure and reliable pathway for data retrieval and integration into Qrvey.
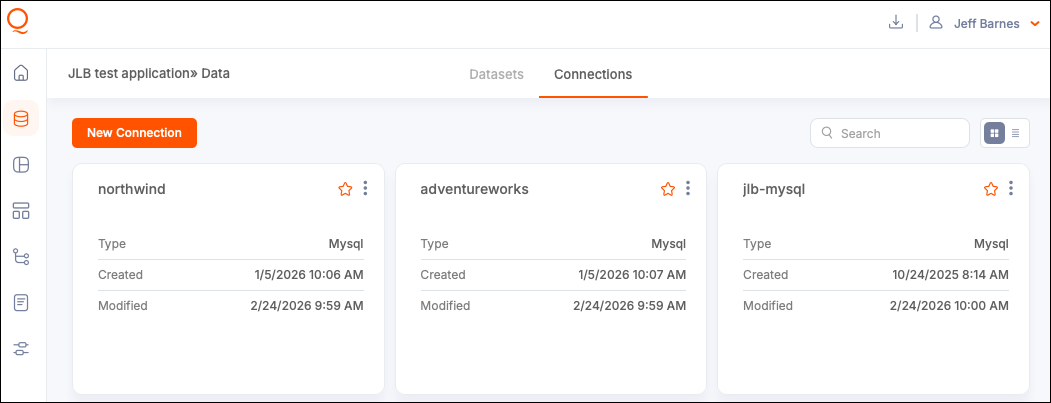
View and Monitor Connections
To view all connections, navigate to the Data Module, then into Connections. An option to preview data displays on connections established directly to a data source, such as a file, table/view, or query. Qrvey provides several monitoring options:
- View Source Data — Find the connection and select View Source Data to display a preview of valid data for loading.
- Verify if Connection is In Use — Select In Use to check how many Datasets are using a specific connection. You can also access this from the options (three-dot) menu.
- Favorite a Connection — Select a star on the connection card to add it to your list of favorites.
Create a Connection
-
Navigate to the Data module and then open Connections.
-
Select New Connection.
-
Select a Connection Type.
- File Upload
- AWS S3 Bucket
- SQL Server
- MS SQL
- MySQL
- PostgreSQL
- Oracle
- Amazon Redshift
- Amazon Athena
- MongoDB
- Snowflake
- DynamoDB
- Databricks
- API connections - Supported in UI to push data into datasets. For more information, see API Connections.
-
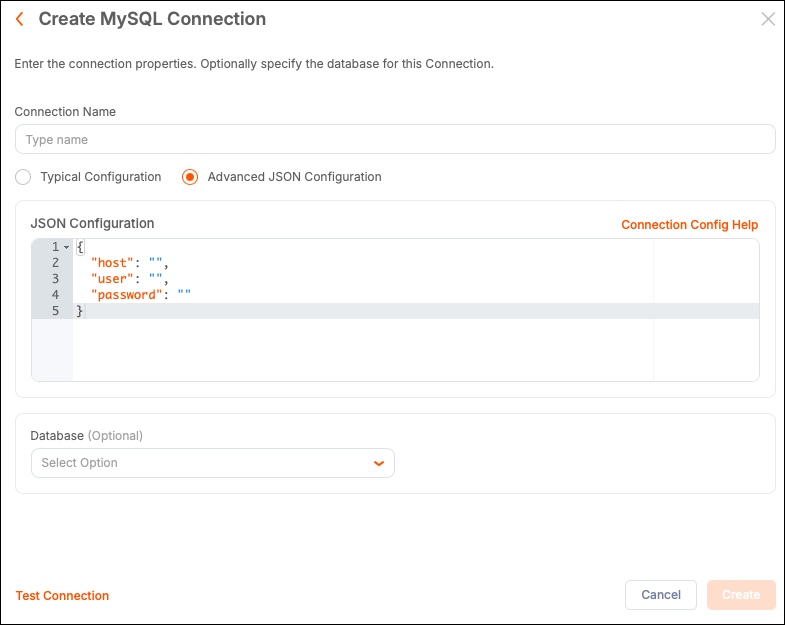
Add a connection name.
-
Add the configuration details. Configuration options vary for each connection type, but all the fields should be descriptive and standard for the relevant database.
-
(Optional) Manually verify your connection by selecting Test Connection in the bottom left corner.
-
Select Create to confirm and create the connection.
The system attempts to connect to the database server when the required information has been provided. A message is displayed to indicate if the connection was successful or it failed.
Note: When the connection to the database server is established, the information can be saved as a new connection. However, this connection is to the database server itself. More information needs to be provided when using the connection to reach a specific database on that server, and a specific table or view in that database, to load data.
Standard Configuration Method
All database types allow configuration using a standard form field interface.
- Required fields are highlighted when information is missing.
- To make your connection more specific, you can select the database from the Database dropdown.
Notes:
- For an Amazon Redshift cluster or Amazon RDS instance, enter the endpoint of the cluster or instance without the port number. For example, if the endpoint value is
clustername.1234abcd.us-west-2.redshift.amazonaws.com:1234, then enterclustername.1234abcd.us-west-2.redshift.amazonaws.com. You can get the endpoint value from the endpoint field on the cluster or the instance detail page in the cloud console. You can also use SSL with the connection by selecting the Use SSL checkbox.- For SQL Server databases, dirty reads can be enabled by selecting the checkbox to set the isolation level to Read Uncommitted.
MySQL Support
Qrvey v9.3 updates the MySQL connector to support MySQL 8.4 and later. When creating a new MySQL connection, the connection card displays MySQL2 as the connection type. If your columns and data structure remain unchanged, you can switch the source of your existing MySQL dataset to the new MySQL2 connection without reloading the data. You can also continue using your existing MySQL connection.
Advanced JSON Method
To include more advanced attributes with your connection, you can use the Advanced JSON Configuration option. Enter a connection attribute as a key/value pair to configure properties that are typically not included, such as timeout and encryption preferences. Keep attribute names accurate when using JSON configuration. The Connection Config Help link opens a new tab with the relevant database documentation.
File Upload Connections
You can create connections by uploading a single file from your local machine. Acceptable file types include CSV, JSON, ndJSON, and Parquet.
File-based data formats are simpler than data stored within a database. This makes the storage medium versatile, yet error-prone. Make sure your data is cleaned, properly formatted, and using best practices for data storage for the particular file type.
Tips for File-Based Data:
- JSON files can contain a top-level array of JSON items.
- Records can be delimited using the ndJSON format.
- Files can be compressed in GZIP format.
- View and Edit Sample JSON Data - The system validates JSON uploads and shows the first record as a sample. You can edit this sample directly to modify the structure of the final dataset uploaded from this connection.
- View Source Data - After saving the connection, select View Source Data to display a partial view of the data.
Amazon S3 Bucket Connection
Amazon S3 Buckets and folders storing CSV, JSON, or ndJSON files can be used as connections. This offers the following features:
-
Bulk data loads from multiple files in the same bucket or folder.
-
Wildcard use in the S3 Folder field.
-
File upload time to S3 is automatically used as a timestamp to enable the "append and update" mode for data synchronization.

By default, Qrvey looks for the named bucket under the same cloud platform account as the instance. To connect to a bucket from a different account, enter the access key and secret key for the account in the provided fields.
-
Optional: Specify a source folder or subfolder for the file upload.
-
Optional: Use a wildcard to match a subset of files:
- To match files that start with
SALES_, usemyFolder/SALES_* - To match files that end
.csv, usemyFolder/*.csv - To match files that contain
data_load, usemyFolder/*data_load*
- To match files that start with
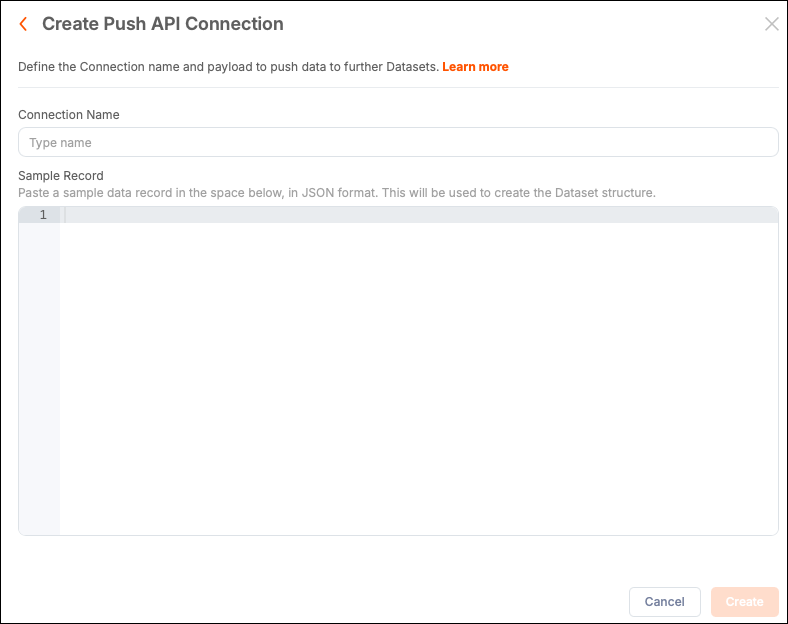
Push API Connections
Qrvey Composer supports the configuration of Push API connections from the Connections page within the Dataset UI. This feature provides “creator” users a low-code way to create datasets that are populated from an API.
To configure a dataset to use a push API connection, complete the following tasks:
- Configure a push API connection.
- Configure a dataset to use the push API connection.
- Execute a push API request to push new data into the dataset.
Configure a Push API Connection
When creating the connection, provide a sample JSON object structure.
-
Create a Connection and select the Push API connection type.
-
Add a name for the connection.
-
Add a sample JSON data structure. For example:
{
    "id": "1",
    "actors" : [
        {
            "name": "Tom Cruise",
            "age": 56,
            "Born At": "Syracuse, NY",
            "Birthdate": "July 3, 1962",
            "photo": "https://jsonformatter.org/img/tom-cruise.jpg"
        }
    ]
}
Ensure this sample JSON exactly matches the structure of the JSON data being pushed by the source API endpoint. Mismatches between the sample JSON data structure and the JSON data returned by the API cause the dataset load to fail.
-
Select Create to save the connection.
Configure a Push API Dataset
After creating the Push API connection, create a new dataset using the Push API connection as the source.
The sample JSON schema you supplied for the source connection is translated into columns with associated column data types.
-
Create a managed dataset and set the push API connection as its data source.
-
Configure the column names and column data types, as well as any transformations, geocoding and record-level security.

- Columns that appear indented below another column are constructed from a hierarchical JSON object array in the sample source JSON provided in the Push API connection.
- Columns of type
Object Arrayare disabled in the Design page and cannot be used to construct unique identifiers, record-level security and column links; however, they can be used within a transformation that operates on array types.
-
Select Apply Changes.
Execute a Push API Request
-
Open the dataset.
-
Select Push API Instructions.

-
Copy the sample cURL command to post data to the dataset.
By default, the sample cURL command uses the same JSON sample schema supplied in the push API connection source as a reminder of the required JSON data structure.
If you do not see a sample cURL command for “Post Data” after selecting the Push API Instructions tab, select Apply Changes in the top-right corner of the Design page.
This page also displays sample cURL commands for “Delete Data” and “Delete All Data” actions. At least one column must be configured as a unique identifier to display the “Delete Data” cURL command. At least one record of data must be present in the dataset to display the “Delete All Data” cURL command.
Joins are not supported for datasets that use Push API source connections. For more information, see Data Joins.
To execute a Push API request, provide the API key associated with the Qrvey Data Router.
The optimal payload size for the Push API is 1MB. You can make concurrent requests and do not need to wait until one request completes before making another request. The maximum recommended number of concurrent requests is 100.
Check Status of the Push API Request
You can check the status of the Push API request using the following cURL command:
curl --location --globoff '{{postdataUrl}}/{{jobId}}/status' \
--header 'x-api-key: {{apikey}}'
Request Variables:
postdataUrl— Provided by Qrvey when your Qrvey instance was initially set up.jobId— Included in the response provided by the Push API request.apikey— Use the API key associated with the Qrvey Data Router.
Possible Response Statuses
InitializingQueryingDatasourcesInitializingQueryingDatasourcesPumpingDatasourcesFillingJoinLakesJoiningFillingEsCompleteTerminatedExitErrorExit
Edit a Connection
Before editing a connection, check for datasets that rely on the connection to avoid potential errors.
- Select an existing connection card or select the options (three-dot) menu and select Edit.
- Select Edit to confirm and open a configuration modal.
- Make your changes and select Save to confirm.
Delete A Connection
Before deleting a connection, check for datasets that rely on the connection to avoid potential errors.
-
Navigate to the Data Module and then into Connections.

-
Select the options (three-dot) menu for a connection and select Delete.
-
In the warning modal, select Delete to confirm.
Warning: If you delete a connection that is in use, the assets that depend on that connection can break. Datasets remain active but cannot be reloaded. Automation flows still run, but actions using the connection do not work.