Applications Page
Qrvey Composer is a web-based platform that enables data analysts to import and manage datasets from many sources, design analytics dashboards, setup automated workflows, and generate pixel perfect reports so that you copy and embed these assets directly into your own site, platform, or application. The platform is tailored for the specific needs of SaaS companies, enabling your team to share, distribute, or embed Qrvey's features within their own platform UIs for fully customized data experiences.
After you've signed up or logged in, you enter the Applications Page, where you can access and manage Your Profile, platform Activity Logs, the Download Manager, and Applications.
Your Profile
- Click the arrow by your name in the upper right corner of the top bar, and a context menu will appear.
- Click Profile/Account to access and manage your profile.
Your Email and Password are required fields. You may also set the following Personal Details:- First Name
- Last Name
- Organization
- Phone Number
- Address - Your IP Address, for general administrative purposes.
- User Avatar - Use your profile email to set your avatar at gravatar.com.
- Changes made to your profile are saved automatically.
Note: Password Recovery is disabled by default and must be enabled your team admin. For details, please see Customizing Qrvey Composer.
Activity Log
The Activity Log tracks significant actions within your user account across all applications, logging events like creation, deletion, updates, and sendeding or receiving of applications. Each data set also has its own individual Activity Log.
Click the Details link adjacent to an event to view relevant metadata, including the user that initiated the event, record count(s), success and failure rates, and the time spent on individual records and total duration.

The Download Manager

The Download Manager provides a central location to access, share, and manage both exported files and scheduled exports. For, more details, please see The Download Manager documentation.
Applications
An application is a self-contained analytics project, composed of five modules:
- Data — Enables configuration and management of the application's data sources.
- Dashboards — A robust data dashboard system to create, browse, configure, customize, and deploy interactive data visualizations.
- Automation — Set triggers, then define conditions and actions to automate tasks within an application.
- Pixel-Perfect Reports — Build highly customizable and detailed reports out of your data and data visualizations.
- Settings — Configure the global settings for an application.
A Connection is the link established between Qrvey and your external data source. This could be a database, a data warehouse, CSV & JSON files, a cloud storage services like AWS, incoming data from REST APIs, or some other system that store data. Connections allow Qrvey to access and retrieve data from these external sources. The main purpose of a connection is to establish a secure and reliable pathway for data retrieval and integration into Qrvey.
Datasets include data from one or more Connections. The transformation process involves cleaning, filtering, aggregating, and joining data to ensure it is ready for analysis. Once the dataset is created, it is stored within Qrvey's infrastructure. The main purpose of a dataset is to provide a structured and optimized collection of data for creating visualizations, reports, and dashboards.
Connections and Datasets work together to create Qrvey's data-driven experience.
- Create connections to external data sources (databases, cloud storage, etc.).
- Import the data from a Connection to create and configure your Dataset(s) as desired.
- Use the Datasets to create Dashboards, Pixel Perfect Reports, and other analytics.
- Embed these within your own application with Qrvey Widgets.
After a user is logged in, they are directed to the Applications page, which serves as a Home page and displays all the Qrvey applications available to them. While navigating the app, a user can return to this page by clicking the home icon in the upper left corner of the Qrvey Composer user interface.

Create an Application
To create an application, follow these steps.
- Navigate to the Applications Page.
- Click Create Applicationin the upper left corner and a modal will appear.
- Provide a Name and Description, then click Next.
- Select Datasets and your application will be created.
Next, you'll want to import data into your Application.
Send an Application

To send an app to another Qrvey user, follow these steps.
- Navigate to the Applications page.
- Find the application you want to send and click its three-dot menu, then click Send.
- Select the email address of the Qrvey user you want to send your application to.
- Ensure the recipient has an active Qrvey account on the same instance.
- Optionally, modify the application's name and description.
- Click Send. You will see a green confirmation message once the application is sent.
- Sending may take several minutes based on the application's size.
Share an Application
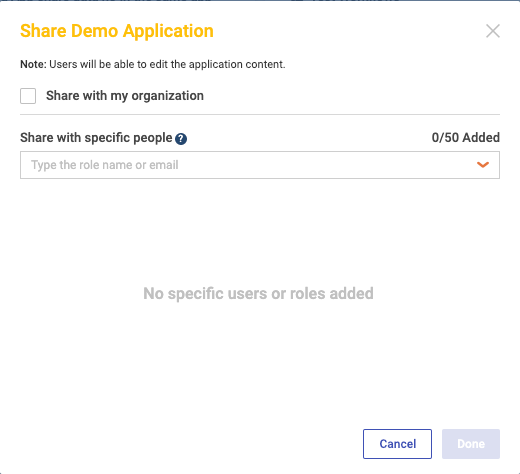
By default, the applications you create in Qrvey Composer are private to your user account.
To share an application, follow these steps.
- Navigate to the Applications page.
- Find the application you want to send and click its three-dot menu, then click Send.
- The Share Application modal will appear.
- You have several sharing options:
- Select Share with my organization to share with all users in your organization.
- Select specific users and roles (please ensure Share with my organization is deselected).
- Click Done to share and exit.
Delete an Application
To delete an application, follow these steps.
- Navigate to the Applications Page.
- Find the application you want to send and click its three-dot menu, then click Send.
- Click Delete and a modal will appear.
- Click Delete to confirm.
Receive an Application

To install an application, follow these steps.
- Look for a notification number on the Received tab in the application dashboard.
- Click the application name for more details and then click Install.
- Once installed, a green notification confirms the application is ready.
- Installation time depends on the application size.
Application Settings

Use this module to configure the name, description, icon, and color scheme for a Qrvey application.
- Name & Icon — Click to edit the name and the description of the application, as well as upload an application icon.
- Primary Color: Choose the primary color for your toolbar and navigation elements.