Migration from V8 to V9 (AWS)
Before starting your migration, contact Qrvey Support. The Support team can provide guidance, answer questions, and help ensure a smooth migration from v8 to v9.
This document explains the process for migrating from Qrvey Platform v8 (AWS Serverless) to v9.3 (AWS Kubernetes).
Note: To migrate to v9.4, you must first migrate to v9.3 and then upgrade to v9.4.
Before You Begin
-
Install the latest version of Docker.
-
Obtain the Docker image tag for the instance version from Customer Support.
-
Obtain your
<REGISTRY_USER>and<REGISTRY_KEY>values from Qrvey Support. -
Obtain the v9 Auto Deploy App URL from Qrvey Support.
-
Ensure admin access to the AWS console where Qrvey Platform is installed. You need to create an access key (
<ACCESS_KEY_ID>) and secret key (<SECRET_ACCESS_KEY>) for this IAM User. -
Have at least one non-IAM Qrvey Composer user account with an Administrator role. If you do not have one, create a new user (or modify an existing one) in the Admin Center with the Administrator role. For more information, see User Management.
Note: After the upgrade, you cannot use IAM user credentials to access the Admin Center. Make sure you have at least one user account with Administrator privileges.
-
Configure Qrvey Admin Center to use SMTP credentials for email. By default, Qrvey Platform uses AWS SES to send emails. If your instance uses SES, follow these steps to switch to SMTP:
- Navigate to AWS SES and generate SMTP credentials. For more information, see Obtaining Amazon SES SMTP credentials.
- Log into the Admin Center and update the email settings to use an SMTP provider. For more information, see Email Settings.
Minimum Permissions Required to Deploy on CloudFormation
{
  "Version": "2012-10-17",
  "Statement": [
    {
      "Sid": "ECSAndFargate",
      "Effect": "Allow",
      "Action": [
        "ecs:CreateCluster",
        "ecs:CreateService",
        "ecs:RegisterTaskDefinition",
        "ecs:Describe*",
        "ecs:UpdateService",
        "ecs:DeleteService",
        "ecs:DeleteCluster",
        "ecs:DeregisterTaskDefinition",
        "ecs:ListClusters"
      ],
      "Resource": "*"
    },
    {
      "Sid": "IAMRoleAndPolicy",
      "Effect": "Allow",
      "Action": [
        "iam:CreateRole",
        "iam:PutRolePolicy",
        "iam:AttachRolePolicy",
        "iam:GetRole",
        "iam:PassRole",
        "iam:DeleteRolePolicy",
        "iam:DeleteRole"
      ],
      "Resource": "*"
    },
    {
      "Sid": "ELBv2",
      "Effect": "Allow",
      "Action": [
        "elasticloadbalancing:CreateLoadBalancer",
        "elasticloadbalancing:CreateListener",
        "elasticloadbalancing:CreateTargetGroup",
        "elasticloadbalancing:ModifyLoadBalancerAttributes",
        "elasticloadbalancing:RegisterTargets",
        "elasticloadbalancing:Describe*",
        "elasticloadbalancing:CreateRule",
        "elasticloadbalancing:DeleteListener",
        "elasticloadbalancing:DeleteRule",
        "elasticloadbalancing:DeleteTargetGroup"
      ],
      "Resource": "*"
    },
    {
      "Sid": "EC2Networking",
      "Effect": "Allow",
      "Action": [
        "ec2:DescribeVpcs",
        "ec2:DescribeSubnets",
        "ec2:DescribeSecurityGroups",
        "ec2:CreateSecurityGroup",
        "ec2:AuthorizeSecurityGroupIngress",
        "ec2:AuthorizeSecurityGroupEgress",
        "ec2:DeleteSecurityGroup",
        "ec2:RevokeSecurityGroupEgress"
      ],
      "Resource": "*"
    },
    {
      "Sid": "Logs",
      "Effect": "Allow",
      "Action": [
        "logs:CreateLogGroup",
        "logs:CreateLogStream",
        "logs:PutLogEvents",
        "logs:DeleteLogGroup",
        "logs:PutRetentionPolicy"
      ],
      "Resource": "*"
    },
    {
      "Sid": "SSM",
      "Effect": "Allow",
      "Action": [
        "ssm:PutParameter",
        "ssm:GetParameter",
        "ssm:GetParameters",
        "ssm:DescribeParameters",
        "ssm:DeleteParameter"
      ],
      "Resource": "*"
    },
    {
      "Sid": "ECR",
      "Effect": "Allow",
      "Action": [
        "ecr:GetDownloadUrlForLayer",
        "ecr:BatchGetImage",
        "ecr:BatchCheckLayerAvailability",
        "ecr:GetAuthorizationToken"
      ],
      "Resource": "*"
    },
    {
      "Sid": "S3Access",
      "Effect": "Allow",
      "Action": [
        "s3:GetObject",
        "s3:PutObject",
        "s3:CreateBucket",
        "s3:DeleteObject"
      ],
      "Resource": "*"
    },
    {
      "Sid": "DynamoDBAccess",
      "Effect": "Allow",
      "Action": [
        "dynamodb:DescribeExport",
        "dynamodb:ExportTableToPointInTime",
        "dynamodb:ListTables",
        "dynamodb:DescribeTable",
        "dynamodb:UpdateContinuousBackups"
      ],
      "Resource": "*"
    },
    {
      "Sid": "CloudFormationDeployment",
      "Effect": "Allow",
      "Action": [
        "cloudformation:CreateStack",
        "cloudformation:UpdateStack",
        "cloudformation:DeleteStack",
        "cloudformation:DescribeStacks",
        "cloudformation:GetTemplate",
        "cloudformation:ValidateTemplate",
        "cloudformation:CreateUploadBucket",
        "cloudformation:GetTemplateSummary",
        "cloudformation:DescribeStackEvents",
        "cloudformation:ListStacks"
      ],
      "Resource": "*"
    }
  ]
}
Migrate to Qrvey V9
Step 1: Install the V9 Qrvey Platform
-
Install and launch the AutoDeploy app.
a. Obtain the CloudFormation template URL for the v9 AutoDeploy app from the Qrvey Support team.
b. Log into your AWS Account and navigate to the CloudFormation service.
c. Create (or update) the Auto Deploy app CloudFormation stack using the CloudFormation template URL.
d. When the stack is created (or updated), navigate to the Outputs tab to copy and save the CloudFormation template URL under the key
EIP. You do not need to launch this URL in a browser window and trigger the upgrade process. This application is used only to migrate the data. -
Add an OpenSearch access policy.
Add the following access policy to your OpenSearch domain to allow access from your public IP address. Replace
REGION,ACCOUNT-ID,OPENSEARCH-NAME, andYOUR_COPIED_PUBLIC_IP(your public IP address from the NAT Gateway) with your actual values:{
"Effect": "Allow",
"Principal": {
"AWS": "*"
},
"Action": "es:*",
"Resource": "arn:aws:es:REGION:ACCOUNT-ID:domain/OPENSEARCH-NAME/*",
"Condition": {
"IpAddress": {
"aws:SourceIp": "YOUR_COPIED_PUBLIC_IP"
}
}
}This grants access to the OpenSearch domain only from the specified IP address.
-
Deploy Qrvey v9.
a. Call the following API to get the default
config.jsonbody. Replace<AutoDeployAppURL>with the CloudFormation template URL.curl --location '<AutoDeployAppURL>/api/v1/deploy/step/migration/configJSON'b. Set up CLI access to your AWS Account from your local machine (or remote access if using another instance).
c. Create a new folder and a new
config.jsonfile. Add the JSON file body returned from the cURL command. Update any missing values:<ACCESS_KEY_ID>(from the prerequisites)<SECRET_ACCESS_KEY>(from the prerequisites)<REGISTRY_USER>(from Customer Support)<REGISTRY_KEY>(from Customer Support)<QRVEY_CHART_VERSION>(Docker image for the instance version to deploy)
d. Add the following variables to the
config.jsonfile:"enable_migration_tool": true,
"migration_config": {
"migration_tool_version": "patch.9.3.2" //-- Depends on the migration tool version
}e. From the CLI, log into the Qrvey Docker Registry using the registry user and key provided by Qrvey Support.
docker login qrvey.azurecr.io -u ${<REGISTRY_USER>} --password-stdin <<< ${<REGISTRY_KEY>}f. Run the install commands with the desired Terraform option. Use
planto preview the deployment orapplyto deploy all changes. Update the value forplatformand the filename as needed.docker run --platform=linux/amd64 -v ./config.json:/app/qrvey/config.json -it --rm qrvey.azurecr.io/qrvey-terraform-aws:${<QRVEY_CHART_VERSION>} applyg. When the deployment is complete, you receive a set of credentials and URLs in the CLI. Save the following values:
-
PostgresqlConnectionFormat:
postgres://<POSTGRES_USER>:<POSTGRES_PASSWORD>@<POSTGRES_HOST>:<POSTGRES_PORT>/<POSTGRES_DATABASE> -
Load Balancer URL.
-
RabbitMQ details.
-
When you start the migration process, set up your connections. For more information, see Configure Redshift, Snowflake, and Postgres during Migration.
Step 2: Start the Migration
Note: Depending on the size of data in your DynamoDB table, you might need to scale the Postgres Aurora RDS to support the data migration. For more information, contact Qrvey Support.
-
Get the
APIKeyandLicensePublicAPIKeyfrom theQrvey<DeployID>MicroserviceCodePipelineCloudFormation stack's Parameters list.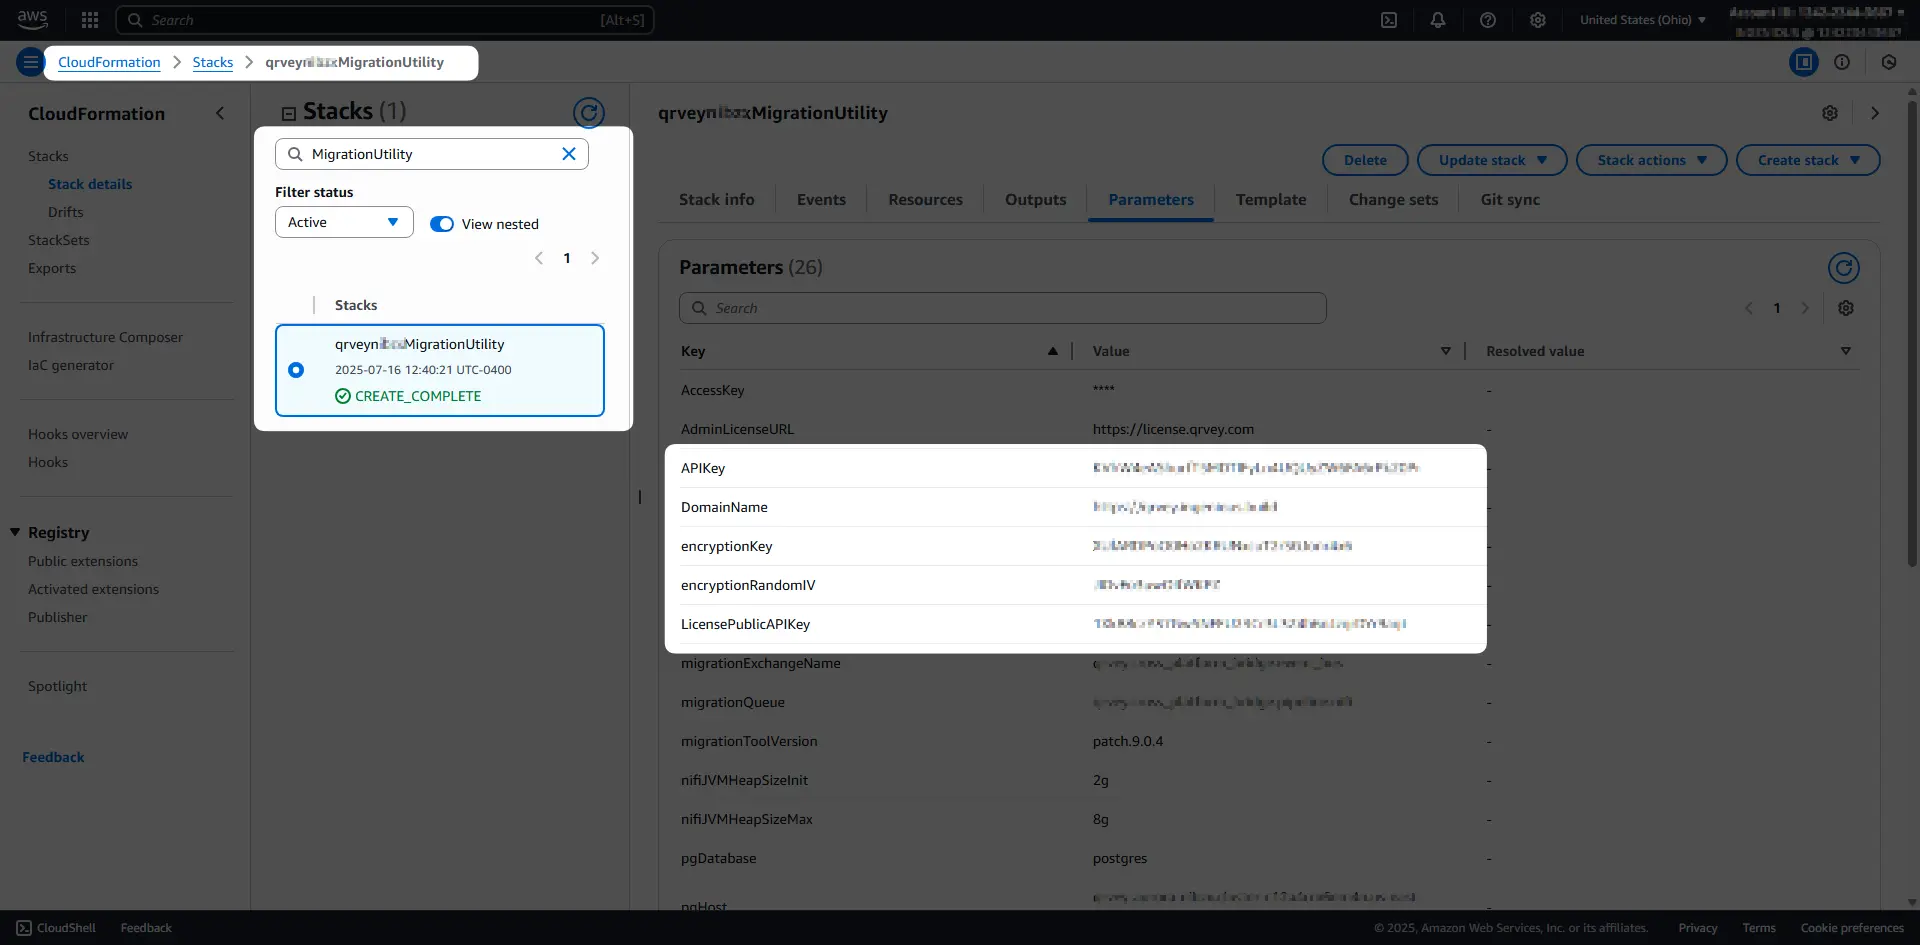
-
Call the following API to trigger the migration process and start copying the metadata:
curl --location '<Migration_Utility_URL>/api/sls-to-mp/migration' \
--header 'x-api-key: <APIKey>' \
--header 'x-api-key-public: <LicensePublicAPIKey>' \
--header 'Content-Type: application/json' \
--data '{
  "delayBeforeDisableApp": "5m",
  "omitClearTargetDbTablesBeforeMigration": false
}'
This API returns a migrationId in the response:
{
  "migrationId": "<MIGRATION_ID>"
}
Save this ID to check the progress of the migration by launching the <MIGRATION_LOAD_BALANCER_INFO> in a browser and pasting the <MIGRATION_ID> into the input box.
Step 3: Restore Services
-
When the migration status changes from
IN_PROGRESStoREADY, update the DNS records to point to the new Load Balancer URL. -
Call the following API to restore all services and update the DNS.
curl --location '<Migration_Utility_URL>/api/sls-to-mp/migration/<MIGRATION_ID>/restore-services' \
--header 'x-api-key: <COMPOSER_API_KEY>' \
--header 'x-api-key-public: <LICENSE_API_KEY>' \
--header 'Content-Type: application/json' \
--data '{
"dns": {
  "name": "<DEPLOYMENT_ID>.qrveyapp.com",
  "type": "CNAME",
  "value": "<LOAD_BALANCER_URL_FROM_STEP_ONE>"
  }
}'- For custom domains, update the DNS properties directly in the DNS provider. Then call the API without passing the DNS object.
- For domains set to
QrveyApp.com, call the API and pass the DNS object in the request body.
During migration, the CloudFront distribution is retained to render images (Composer Logo, App Logo, Images added in Dashboard, Pixel Perfect, and so on), and other files.
-
To ensure that all resources are properly initialized after the data migration, run the
applycommand (from Step 1: Install the Qrvey Platform) using the following flags:
docker run --platform=linux/amd64 -v ./config.json:/app/qrvey/config.json -it --rm qrvey.azurecr.io/qrvey-terraform-aws:${<QRVEY_CHART_VERSION>} apply --skip-data-sync-jobs --skip-restart --skip-cleanup-orphans
Step 4: Test the New Environment
Test the new environment for all features before removing the old infrastructure.
Note: When migrating from v8.x to v9.x, the style colors configured in Admin remain as previously set. However, because the base styles have changed in v9, your application display might differ. To fix this, use the "Restore Default Styles" link in the Admin Center under General > Styles.
Step 5: Clean Up V8 Resources
Call the following APIs to remove v8 resources:
-
Set a
RETAINpolicy on all S3 buckets and DynamoDB tables to prevent deletion. This should take about 10-15 minutes to process.curl --location --request PUT '<AutoDeployAppURL>/api/v1/deploy/step/migration/resourcestomp' --data '' -
Remove all v8 CloudFormation templates that are not needed in v9. This process takes about an hour. If any of the templates fail to delete, they can be manually deleted later.
curl --location --request DELETE '<AutoDeployAppURL>/api/v1/deploy/step/migration/removev8stacks' --data ''
Note: You can run the migration so that both v8 and v9 instances are active at the same time (with some limitations). This allows you to verify that everything works in v9 before switching and removing the v8 instance. To obtain the steps to perform this type of migration, contact Qrvey Support.