Azure Deployment
This page describes how to deploy a new Qrvey MultiPlatform Environment in Azure.
AKS Support
Azure Kubernetes Service (AKS) v1.33 is the default version starting in v9.2.5. AKS v1.32 discontinues standard support on March 23, 2026. Qrvey recommends that all v9.2.x customers upgrade to v9.2.5. If you have a question about AKS support on the Qrvey platform, contact Qrvey Support.
Requirements
- Registry User and Password - Provided by the Qrvey Support team.
OWNERAccess Permissions - Required for an Azure subscription or resource group to create a service principal and assign it a contributor role to the resource group being used.- Minimum CIDR - The VPC (or equivalent) used to deploy the Qrvey Platform must have a minimum CIDR of
/22. - Docker - Required to run the auto-deploy script.
- Docker Image - The Docker Image for the desired version, found in the release notes.
- Azure Portal Subscription - Needed for billing and resource installation in Azure.
- Azure Resource Group - Groups all Qrvey resources.
- Azure Storage Account - Stores an Azure container.
- Azure Synapse - Analytics service. For more information, see Synapse Configuration.
- Azure Container - Stores Terraform state.
- SMTP Server - Used to send emails.
- DNS Hosted Zone (Optional) - Generates valid SSL certificates for the Qrvey Composer domain. If no domain is set up, a default domain will be generated in the format:
$deployment_id.mp.qrveyapp.com.
Note: Before deploying, ensure your Azure subscription quotas are sufficient for the required resources. You might need to request quota increases for the following:
- Epdsv6 family: 100 vCPU
- Dpdsv6 family: 100 vCPU
- Spot cores: +50–100 vCPU (depending on expected spot usage) Quota increases can be requested through the Azure Portal. Insufficient quotas can cause deployment failures. The initial deployment does not use all of these CPUs; the higher quota is required to support autoscaling as your environment grows.
Installation
Create Service Principal
Run the following command in a terminal within your Azure account. Ensure the account has OWNER access permissions.
az ad sp create-for-rbac --role="Contributor" --scopes="/subscriptions/20000000-0000-0000-0000-000000000000"
The output will contain your Service Principal details, similar to the following:
{
  "appId": "00000000-0000-0000-0000-000000000000", # ARM_CLIENT_ID
  "displayName": "azure-cli-2017-60-05-10-42-15",
  "name": "http://azure-cli-2017-60-05-10-42-15",
  "password": "0000-0000-0000-0000-000000000000", # ARM_CLIENT_SECRET
  "tenant": "00000000-0000-0000-0000-000000000000" # ARM_TENANT_ID
}
Create Azure Resources
Using default configurations, create the following resources:
- Create a Resource Group in Azure.
- Within the Resource Group, create a Storage Account.
- Inside the Storage Account, create a Container.
Ensure these resources are created in the same datacenter region as your Qrvey application.
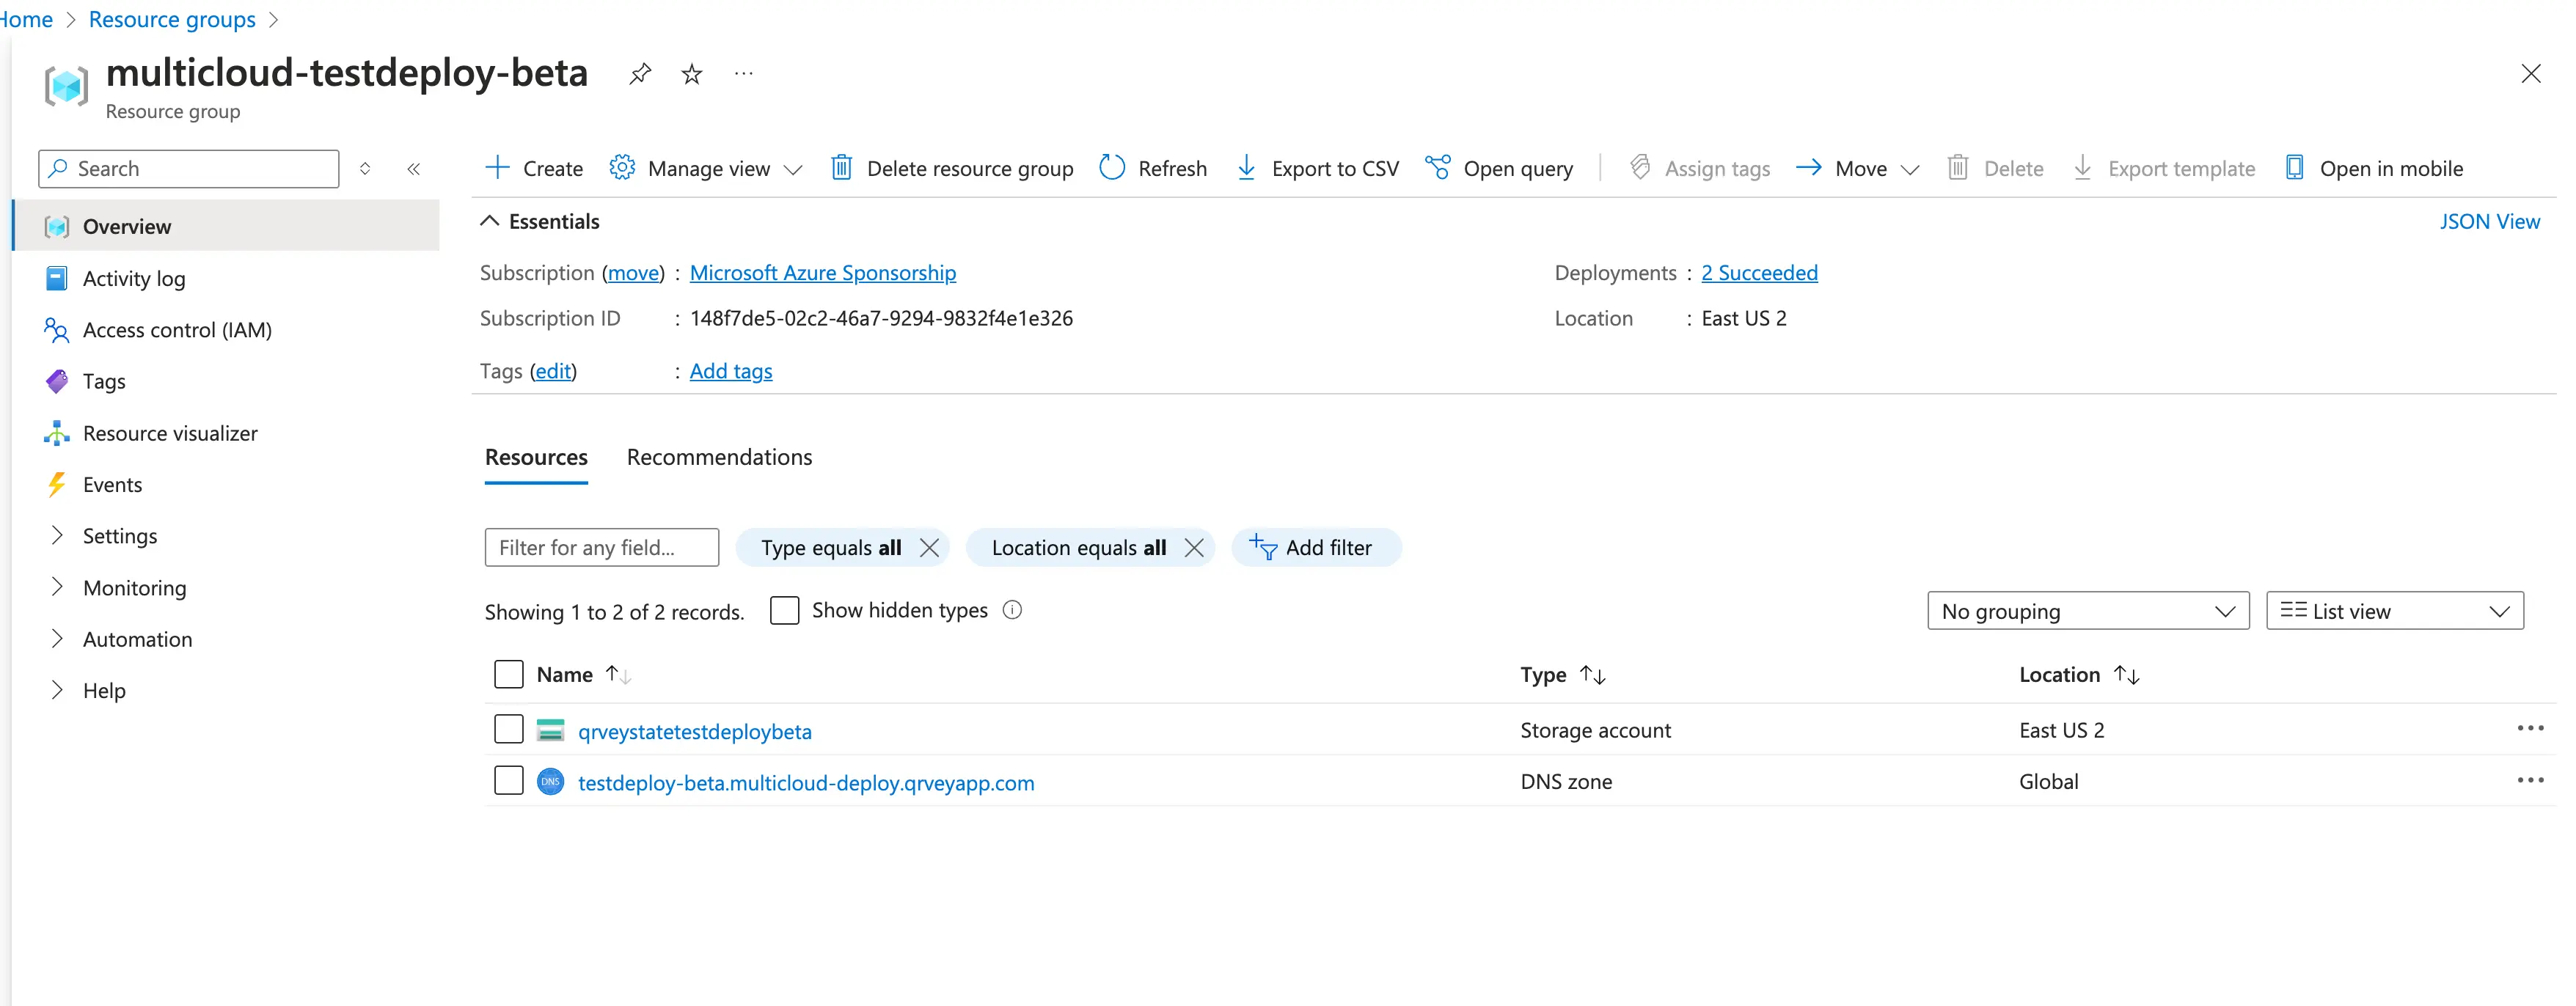
This is what your Resource Group should look like before installing Qrvey.
Prepare Installation Files
To install Qrvey in your Azure account, create the following file:
{
  "account_config": {
    "resource_group_name": "<AZURE_RESOURCE_GROUP_NAME>",
    "storage_account_name": "<AZURE_STORAGE_ACCOUNT_NAME>",
    "container_name": "<STORAGE_CONTAINER_NAME_TO_STORE_STATE_FILE>",
    "key": "<STATE_FILE_NAME>",
    "ARM_CLIENT_ID": "<SERVICE_PRINCIPAL_APPID>",
    "ARM_CLIENT_SECRET": "<SERVICE_PRINCIPAL_PASSWORD>",
    "ARM_TENANT_ID": "<SERVICE_PRINCIPAL_TENANT>",
    "ARM_SUBSCRIPTION_ID": "<AZURE_SUBSCRIPTION_ID>"
  },
  "variables": {
    "dns_zone_name": "", // (Optional)
    "registry_user": "<REGISTRY_USER_PROVIDED_BY_QRVEY_SUPPORT>",
    "registry_key": "<REGISTRY_KEY_PROVIDED_BY_QRVEY_SUPPORT>",
    "qrvey_chart_version": "<QRVEY_VERSION>", // found at the end of the docker image provided above under pre-requisites
    "location": "eastus2", // Azure location for resources
    "enable_location_services": true,
    "enable_synapse": true,
    "managed_nat_gateway": false,
    "es_config": {  // Elasticsearch Config
      "size": "large",
      "count": 1
    },
    "customer_info": {
      "firstname": "",
      "lastname": "",
      "email": "email@company.com",
      "company": "<COMPANY_NAME>"
    },
    "initial_admin_email": "admin@company.tld",
    "globalization": {
      "google_client_email": "",
      "google_client_private_key": "",
      "google_document_id": "",
      "google_document_sheet_title": ""
    }
  }
}
Installation
When these prerequisites are ready, install Qrvey:
-
Navigate to the directory containing the configuration files.
-
Log into the Qrvey Registry:
docker login qrvey.azurecr.io --username $registry_user --password-stdin <<< $registry_key -
Run the installation command with the desired Terraform option (
plan,apply,output, ordestroy). For installation, useapply. The installation process should take about 45 minutes to an hour.docker run --platform=linux/amd64 -v $(pwd)/config.json:/app/qrvey/config.json -it --rm qrvey.azurecr.io/qrvey-terraform:${qrvey_version} applyAfter running the
applycommand, wait until the process finishes and review the resources created. You should see something similar to the following image:
At the end of the installation, you will find the following output:
    ##########
  ###      ####
  ###          ###    +++ +++      +++  +++++  +++      ++
##            ### ++++   +++    +++ +++   +++ ++     +++
##            ### ++      ++   +++ +++   ++++  ++   +++
##            ### ++       ++  ++  ++++++++    +++  ++
###          ###  ++       ++++++  +++          ++++++
  ####    #####   ++        ++++    +++   +++    ++++
    ########      ++         ++      +++++++     +++
    #####      #                                 ++
        ########                              ++++

============================================================
               Qrvey Environment Details
============================================================
Deployment ID:            deployment-id
Environment URL:          https://deployment-id.mp.qrveyapp.com
Admin Portal URL:         https://deployment-id.mp.qrveyapp.com/admin/app/
Admin User:               admin@company.tld
Admin Password:           generated_admin_password
Qrvey API Key:            qrvey_api_key
------------------------------------------------------------
PostgreSQL Connection:    postgres://qrvey_usr:db_password@deployment-id-qrvey-db.postgres.database.azure.com:5432/postgres
------------------------------------------------------------
Elasticsearch Host:       https://1.2.3.4:9200/
Elasticsearch User:       elastic
Elasticsearch Password:   elastic_password
------------------------------------------------------------
RabbitMQ Host:            http://Qrvey:rabbit_password@rabbit_host:15672/#/
============================================================ -
Configure communication with Synapse, which is used in data joining operations.
-
For the first login, use the admin username and password provided in the deployment output.

Note:
To use a custom domain for your deployment, set the property"dns_zone_name"under the"variables"object in yourconfig.jsonto the desired URL.
After deployment, you will receive a Load Balancer URL in the output. Set this Load Balancer URL as the target for the CNAME record of your custom domain in your DNS provider.
Azure Deployment Input Variables
This section describes the input variables available for Azure deployment using Terraform. Each variable can be customized to fit your deployment requirements. Refer to the table below for variable names, types, default values, and descriptions.
| Variable Name | Type | Default Value | Description |
|---|---|---|---|
aks_cluster_version | string | "" | Upgrade only. Upgrades AKS to v1.33 when performing a Qrvey upgrade to v9.2.5. Required value: "1.33.0". Requires an additional command when running the Qrvey upgrade. |
aks_nodepool_version | string | "" | Upgrade only. Upgrades AKS to v1.33 when performing a Qrvey upgrade to v9.2.5. Required value: "1.33.0". Requires an additional command when running the Qrvey upgrade. |
ARM_CLIENT_ID | string | "" | Required. Azure Service Principal Client ID. |
ARM_CLIENT_SECRET | string | "" | Required. Azure Service Principal Client Secret. |
ARM_TENANT_ID | string | "" | Required. Azure Tenant ID. |
ARM_SUBSCRIPTION_ID | string | "" | Required. Azure Subscription ID. |
resource_group_name | string | "" | Required. Name of the Azure Resource Group. |
storage_account_name | string | "" | Name of the Azure Storage Account. |
container_name | string | "" | Name of the Azure Storage Container. |
key | string | "terraform.tfstate" | Name of the Terraform state file. |
dns_zone_name | string | "" | DNS zone name (optional). |
enable_monitoring | bool | false | Enable monitoring features. When generated, Qrvey environment details include Grafana credentials. For more information, see Configure Monitoring and Logging |
registry_user | string | "" | Required. Qrvey registry user. |
registry_key | string | "" | Required. Qrvey registry key. |
qrvey_chart_version | string | "" | Required. Qrvey chart version. |
location | string | "eastus2" | Azure location for resources. |
enable_location_services | bool | false | Enable location services. |
enable_synapse | bool | false | Deploy Synapse chart. |
managed_nat_gateway | bool | false | Use managed NAT gateway for outbound connectivity. |
es_config | object | {} | Elasticsearch config (size, count). |
customer_info | object | {} | Required. An object containing customer information.. |
initial_admin_email | string | "" | Required. Initial admin email. |
globalization | object | {} | Globalization settings (google_client_email, google_client_private_key, and so on). |
create_resource_group | bool | false | Create resource group or use an existing one. |
storage_account_replication_type | string | "LRS" | Storage account replication type. Valid values are LRS, GRS, RAGRS or ZRS. |
network_plugin | string | "azure" | Network plugin to use. |
network_policy | string | "azure" | Network policy to use. |
network_address_space | list(string) | ["10.208.0.0/12"] | Network address space. |
subnet_address_prefixes | list(string) | ["10.220.0.0/20"] | Subnet address prefixes. |
openai_api_key | string | "sk-xxxxxxxxxx" | OpenAI API key. |
security_headers | object | {} | Allows customers to modify security headers in the HTTP response. For an example, see HTTP Response Security Headers |
table_hierarchy_enabled | bool | false | Enable table hierarchy feature. |
rabbitmq_replica_count | number | 3 | Number of replicas for the RabbitMQ cluster. If you are upgrading from v9.1.x to 9.2.2 or later, use this flag to keep the replicas at 3. |
dataload_config | object | {} | (Available starting version 9.2.2) Configuration for dataset loading microservices. Allows setting min/max replicas for each datarouter pod. All properties are optional. |
customer_info
{
  "firstname": "string",
  "lastname": "string",
  "email": "string",
  "company": "string"
}
es_config
{
  "size": "large", // can be small, medium, large, xlarge, 2xlarge, 4xlarge
  "count": 1
}
globalization
{
  "google_client_email": "", // optional
  "google_client_private_key": "", // optional
  "google_document_id": "", // optional
  "google_document_sheet_title": "" // optional
}
HTTP Response Security Headers
"security_headers": {
    "content_security_policy": "default-src * 'unsafe-inline' 'unsafe-eval' data: blob:; script-src * 'unsafe-inline' 'unsafe-eval'; style-src * 'unsafe-inline';",
    "x_frame_options": "SAMEORIGIN",
    "cache_control": "no-cache, no-store, must-revalidate",
    "referrer_policy": "unsafe-url"
  }
dataload_config
The dataload_config object allows you to configure resource requests/limits and autoscaling for each microservice involved in dataset loading. All properties under dataload_config are optional. If you do not specify some properties, the system will use default values, which are the ones shown in the example below. Available starting version 9.2.2.
Note: Changing these properties will directly impact the data loading process and can be used to increase or decrease performance. Increasing the maximum number of replicas can improve throughput, but will also increase cloud costs. Adjust these values carefully based on your needs and budget.
{
  "dr_file_pump": {
    "resources": {
      "requests": {
        "memory": "768Mi",
        "cpu": "15m"
      },
      "limits": {
        "memory": "768Mi",
        "cpu": "1500m"
      }
    },
    "autoscaling": {
      "min_replicas": 1,
      "max_replicas": 2
    }
  },
  "dr_db_pump": {
    "resources": {
      "requests": {
        "memory": "512Mi",
        "cpu": "15m"
      },
      "limits": {
        "memory": "3072Mi",
        "cpu": "1500m"
      }
    },
    "autoscaling": {
      "min_replicas": 1,
      "max_replicas": 2
    }
  },
  "dr_join_results_pump": {
    "resources": {
      "requests": {
        "memory": "256Mi",
        "cpu": "100m"
      },
      "limits": {
        "memory": "1024Mi",
        "cpu": "1"
      }
    },
    "autoscaling": {
      "min_replicas": 1,
      "max_replicas": 10
    }
  },
  "dr_transformation": {
    "resources": {
      "requests": {
        "memory": "256Mi",
        "cpu": "100m"
      },
      "limits": {
        "memory": "2096Mi",
        "cpu": "2"
      }
    },
    "autoscaling": {
      "min_replicas": 1,
      "max_replicas": 5
    }
  },
  "dr_put_chunk_to_lake": {
    "resources": {
      "requests": {
        "memory": "256Mi",
        "cpu": "50m"
      },
      "limits": {
        "memory": "1536Mi",
        "cpu": "1"
      }
    },
    "autoscaling": {
      "min_replicas": 1,
      "max_replicas": 10
    }
  },
  "dr_put_chunk_to_dl": {
    "resources": {
      "requests": {
        "memory": "256Mi",
        "cpu": "15m"
      },
      "limits": {
        "memory": "1536Mi",
        "cpu": "1"
      }
    },
    "autoscaling": {
      "min_replicas": 1,
      "max_replicas": 10
    }
  }
}
Property Descriptions
- Each top-level key (for example,
dr_file_pump,dr_db_pump) represents a microservice involved in dataset loading. resources- Specifies resource requests and limits for CPU and memory for each microservice pod.requests- Minimum resources guaranteed for the pod.limits- Maximum resources the pod can use.
autoscaling- Controls the minimum and maximum number of replicas for each microservice.min_replicas- Minimum number of pods to run.max_replicas- Maximum number of pods to run.
Upgrade to a Newer Version
The upgrade process can take up to 2 hours of downtime. Plan to perform upgrades during off hours.
To upgrade your Qrvey MultiPlatform Environment to a newer version, follow the Installation steps. While doing so, make the following update to the Installation File:
- Change the
qrvey_chart_versionvariable in yourconfig.jsonfile to the new version.
After updating the version, repeat Steps 1-3 from the Installation section, using the updated qrvey_version value in the relevant commands.
This applies the upgrade and updates your environment to the specified version.
Customize a Deployment
You can customize your existing Qrvey deployment by modifying the parameters in your config.json file and re-applying the configuration. This allows you to change various settings without needing to redeploy from scratch.
To customize your deployment:
-
Navigate to the directory containing your
config.jsonfile. -
Edit the
config.jsonfile and modify the desired parameters under the"variables"object. -
Save the changes.
-
Run the apply command to update your deployment:
docker run --platform=linux/amd64 -v $(pwd)/config.json:/app/qrvey/config.json -it --rm qrvey.azurecr.io/qrvey-terraform:${qrvey_version} apply -
Wait for the process to complete and review the output.
Example: Changing the Domain (DNS) for an Existing Instance
One common customization is setting up a custom domain for your Qrvey deployment.
-
Update your
config.jsonfile.Set the
dns_zone_nameproperty under the"variables"object to your desired custom domain:{
"account_config": {
// ... existing account config ...
},
"variables": {
// ... other variables ...
"dns_zone_name": "qrvey.yourdomain.com"
}
} -
Apply the changes.
Run the apply command to update your deployment:
docker run --platform=linux/amd64 -v $(pwd)/config.json:/app/qrvey/config.json -it --rm qrvey.azurecr.io/qrvey-terraform:${qrvey_version} apply -
Configure DNS.
After the apply process completes, the output includes a Load Balancer URL entry. For example:
Load Balancer URL: qrvey-lb-12345678.eastus2.cloudapp.azure.comAdd a CNAME record to your DNS provider:
- Name/Host -
qrvey(or your desired subdomain) - Type - CNAME
- Value/Target - The Load Balancer URL from the output (for example,
qrvey-lb-12345678.eastus2.cloudapp.azure.com) - TTL - 300 (or your preferred value)
After you add the CNAME record, it can take a few minutes to several hours for DNS changes to propagate globally, depending on your DNS provider and TTL settings.
- Name/Host -
-
Access your deployment.
After DNS propagation is complete, you can access your Qrvey deployment using your custom domain (for example,
https://qrvey.yourdomain.com).
Note: Make sure your DNS provider supports CNAME records for the subdomain you're configuring. Some providers might require additional configuration for apex domains (root domains without subdomains).
Remove an Instance
To remove (destroy) a Qrvey MultiPlatform Environment instance and all associated resources, follow these steps:
- Navigate to the directory containing your
config.jsonfile. - Run the destroy command to preview the resources that will be removed (similar to a Terraform "plan"):
docker run --platform=linux/amd64 -v $(pwd)/config.json:/app/qrvey/config.json -it --rm qrvey.azurecr.io/qrvey-terraform:${qrvey_version} destroy
- To actually remove all resources, run the destroy command with the
--approveflag:
docker run --platform=linux/amd64 -v $(pwd)/config.json:/app/qrvey/config.json -it --rm qrvey.azurecr.io/qrvey-terraform:${qrvey_version} destroy --approve
Warning: When the resources are removed, all data and metadata associated with the instance will be permanently deleted and cannot be recovered.
Set Up OpenAI in Azure
To set up an OpenAI connection in Azure, see Connect to AI Providers.