Deployment Jobs
A deployment job executes the type of deployment specified by one or more deployment definitions against one or more target servers. Deployment jobs consist of blocks of instructions, with each block configuring the deployment of one deployment definition to any number of users on one destination server. This enables you to use one deployment job to deploy multiple applications to as many users as necessary, on multiple environments. Deployment jobs require at least one block.
Before You Begin
Verify that the desired Deployment Definition has been created.
Tip: To give all users from one organization access to an application within the same environment, consider making the application public instead of deploying it to all users. This prevents the application from being replicated as copies of the original.
Create a Deployment Job
-
In the Qrvey Admin Center, select the Content Deployment icon in the left navigation panel to display the Deployment Jobs tab.
-
Select Create Job to open the Deployment Job page.
-
Deployment jobs are made up of one or more blocks that combine configuration information.
a. In Block 1, use the dropdown lists to select the following:
-
Deployment Definition - Select an existing deployment definition.
-
Destination Server - Select the target server for the deployment.
-
Recipient Users - Select one or more target user accounts for the deployed application.
The page updates to display additional sections containing details about the deployment definition (Deployment Definition Summary, User Destination Content, Parameter, Users sections). To display additional information about the entries in the summary and users sections, select their Details links.
b. Edit any parameter tokens or content tokens if needed. These values are resolved in the deployment job.
-
-
To add a new block, select Add Block and repeat these steps.
Tip: To deploy one application to several destination servers, create a block for each server.
Edit a Parameter Token
To assign values to the tokens created in the Deployment Definitions page, go to the Parameters section and select the Configure link. In the Configure Parameters modal:
- Enter a value for each user.
- To use the same value for multiple users, select those users, then select the Bulk Edition link and enter the common value in the field provided.
- Select OK to save your changes.
To review the token details for a user before deploying, select the Details link from an entry in the Users section.
Content Tokens
Content tokens are created when the deployment definition is configured as an update to an existing application. A content token is a system-generated parameter that is automatically created for a value that needs to be resolved for each recipient. They are configured in the deployment job definition.
If multiple users are selected as recipients of the deployed application, the system resolves the content token for each user. This enables the deployment job to update the application for each recipient user.
The content token is resolved when the deployment job runs. While it uses {{token}} syntax like the parameter token, this token is assigned by the system and applies to a database object instead of a field name. For example, it identifies entries as application and connection instead of "application name” and “connection username”.
When a deployment definition is configured as a new application, it doesn’t have any content tokens to configure.
Auto-Map Assets
To deploy successfully, you need to map all content tokens to the existing data on the destination server. You can edit content tokens manually or allow the system to automatically map tokens with the destination assets.
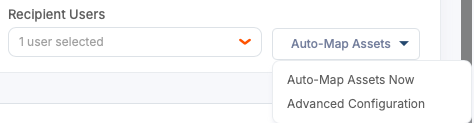
- Auto-Map Assets Now - Automatically selects the first deployed application for the user on the destination server and auto-maps content tokens to the assets in that application.
- Advanced Configuration - Select an application before auto-mapping.
Note: If the Deploy button is disabled, check the User Destination Content section for missing information. You cannot run the deployment job until content tokens are configured correctly.
Edit a Content Token
You may need to edit your content token if it wasn’t mapped with the auto-mapping process or if you want to change its mapping.
-
In the deployment job, go to the User Destination Content section.
-
Locate the content token and select its Configure link.
Note: If a Configure link is disabled, one or more of its prerequisite content tokens have not been configured.
-
Configure the destination content using the options provided.
-
When finished, select OK. The User Destination Content table refreshes to display the mapping.
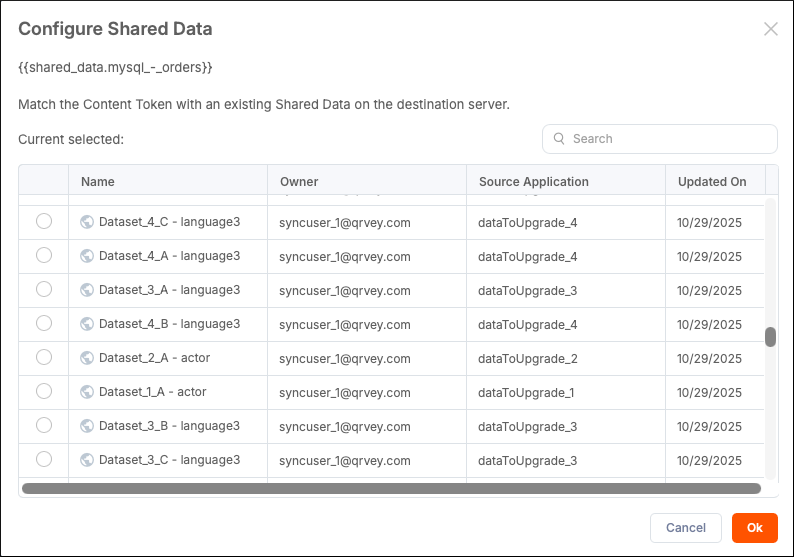
Configure Shared Data
If a deployment definition includes datasets or views created from a shared dataset but doesn’t include the shared dataset itself, the deployment definition automatically includes the system-selected shared dataset as a dependency. You can change the included shared dataset mapping in the User Destination Content section by selecting the Configure link. The Configure Shared Data modal opens, where you can match the shared dataset content token with the desired shared dataset on the destination server.
Run a Deployment Job
-
In the Qrvey Admin Center, select the Content Deployment icon in the left navigation panel to display the Deployment Jobs tab.
-
From the table, select the corresponding job's options menu, then select Edit.
-
If the Deploy button is disabled, add any missing information.
-
Review the deployment definition by selecting its Details link.
-
Select Deploy.
-
Select one of the following options for handling failures:
- Skip the failed installation for the user and continue installing to the remaining users.
- Keep the failed asset and its dependencies and continue the installation.
-
Select OK to run the deployment.
Note: You cannot modify a deployment job after it runs.
Delete a Deployment Job
To delete an existing deployment job, select its corresponding options menu from the deployment jobs list, then select Delete.