Deployment Jobs
A deployment job executes the type of deployment specified by one or more deployment definitions against one or more target servers.
Overview
Deployment jobs consist of blocks of instructions, with each block configuring the deployment of one deployment definition to any number of users on one destination server. This enables you to use one deployment job to deploy multiple applications to as many users as necessary, on multiple environments. Deployment jobs require at least one block.
Before You Begin
Verify that the appropriate Deployment Definition has been created.
Tip: To give all users from one organization access to an application within the same environment, consider making the application public instead of deploying it to all users. This prevents the application from being replicated as copies of the original.
Create a Deployment Job
-
In the Qrvey Admin Center, select the Content Deployment icon in the left navigation panel to display the Deployment Jobs tab.
-
Select Create Job to open the Deployment Job page.
-
Configure a block.
a. In Block 1, use the dropdown lists to select the following:
-
Deployment Definition - Select an existing deployment definition.
-
Destination Server - Select the target server for the deployment.
-
Recipient Users - Select one or more target user accounts for the deployed application.
The page updates to display additional sections containing details about the deployment definition (Deployment Definition Summary, User Destination Content, Parameters, and Users sections). To display additional information about the entries in the summary and users sections, select their Details links.
b. Edit any parameter tokens or content tokens if needed. These values are resolved in the deployment job.
-
-
To add a new block, select Add Block and repeat these steps.
Tip: To deploy one application to several destination servers, create a block for each server.
Edit a Parameter Token
To assign values to the tokens created on the Deployment Definitions page, go to the Parameters section and select the Configure link to open the Configure Parameters modal.
- Enter a value for each user.
- To use the same value for multiple users, select those users, then select the Bulk Edit link and enter the common value in the field provided.
- Select OK to save your changes.
To review the token details for a user before deploying, select the Details link from an entry in the Users section.
Content Tokens
Content tokens are created when the deployment definition is configured as an update to an existing application. A content token is a system-generated parameter for a value that must be resolved for each recipient. They are configured in the deployment definition.
If multiple users are selected as recipients of the deployed application, the system resolves the content token for each user. This enables the deployment job to update the application for each recipient user.
The content token is resolved when the deployment job runs. While it uses {{token}} syntax like the parameter token, this token is assigned by the system and applies to a database object instead of a field name. For example, it identifies entries as application and connection instead of application name and connection username.
When a deployment definition is configured as a new application, it does not contain any content tokens.
Auto-Map Assets
To deploy successfully, you need to map all content tokens to the corresponding assets on the destination server. You can edit content tokens manually or allow the system to automatically map tokens with the destination assets.
Auto-Mapping During Update
When a deployment job's definition is configured to update an existing app, the auto-mapping process runs as the job builds after making either of the following changes:
- Adding users to the job.
- Selecting or changing a user's mapped application.
In both cases, the process only runs for the users who were just added or changed.
Manual Process
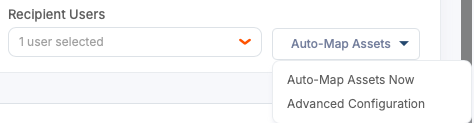
- Auto-Map Assets Now - Automatically selects the first deployed application for the user on the destination server and auto-maps content tokens to the assets in that application.
- Advanced Configuration - Allows you to select a specific application before running the auto-map process.
Note: If the Deploy button is disabled, check the User Destination Content section for missing information. You cannot run the deployment job until content tokens are configured correctly.
After the auto-mapping process runs, you can change the installation type within a deployment job.
- Update - The asset matches an existing asset in the target application. The existing asset is updated.
- New - No match is found in the target application. The system creates a new asset.
For more information, see Asset Update Behavior.
Edit a Content Token
You might need to edit your content token if it was not mapped with the auto-mapping process or if you want to change its mapping.
-
In the deployment job, go to the User Destination Content section.
-
Locate the content token and select its Configure link.
Note: If a Configure link is disabled, one or more of its prerequisite content tokens have not been configured.
-
Configure the destination content using the options provided.
-
When finished, select OK. The User Destination Content table refreshes to display the mapping.
Change the Installation Type in a Job
After auto-mapping runs, you can change the installation type for an asset within the deployment job:
- Change Update to New - The asset is created in the target application instead of updating an existing asset.
- Change New to Update - You must manually select the target asset for the mapping. The job cannot run until the mapping is complete.
You can re-run the auto-mapping process at any time, including with the advanced configuration options.
Note: Changes to installation types apply only to the deployment job. The deployment definition is not modified, which allows the same definition to be reused across jobs with different mappings.
Source Dataset Mapping
Source datasets that are not deployed as content must be mapped manually. Select a mapping option for each unmapped source dataset. The deployment job is not considered complete until every source dataset has been mapped.
Configure Shared Data
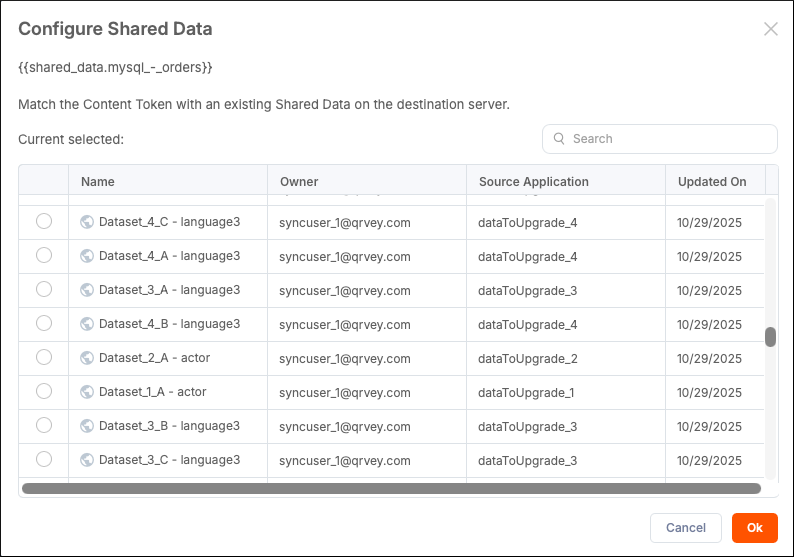
If a deployment definition includes datasets or views created from a shared dataset but does not include the shared dataset itself, the deployment definition automatically includes the system-selected shared dataset as a dependency. You can change the included shared dataset mapping in the User Destination Content section by selecting the Configure link. The Configure Shared Data modal opens, where you can match the shared dataset content token with the desired shared dataset on the destination server.
Run a Deployment Job
When a deployment job updates an existing application, Content Deployment automatically creates a backup of the target application before applying new changes. The backup process can fail if the target application contains corrupted content. After selecting Deploy, you can choose what to do in case of failure. Failure handling applies to both new deployments and updates.
-
In the Qrvey Admin Center, select the Content Deployment icon in the left navigation panel to display the Deployment Jobs tab.
-
From the table, select the corresponding job's options (three-dot) menu, then select Edit.
-
If the Deploy button is disabled, add any missing information.
-
Review the deployment definition by selecting its Details link.
-
Select Deploy.
-
In the Deploy modal, select one of the following options for handling failures:
- Skip the failed installation for the user and continue installing to other users.
- Keep failed assets and dependencies and continue installing.
-
Select OK to run the deployment job.
Note: You cannot modify a deployment job after it runs.
Cancel a Deployment Job
You can cancel a deployment job after execution starts. The Cancel link becomes available after the job begins.
You can cancel a running job from either of these areas under the Deployment Jobs tab:
-
The job's options menu in the Deployment Jobs list:

-
The Deployment Jobs details page:

This action stops all pending operations in the deployment job. Active data loads are allowed to complete before the cancellation takes effect. Any processes that have already taken place, such as asset installation, are preserved and not rolled back. After the cancellation completes, the job status changes to Canceled.
Delete a Deployment Job
To delete an existing deployment job, select its corresponding options menu from the Deployment Jobs list, then select Delete.