Record-Level Security
The Record-Level Security feature restricts access to individual rows (record) in your datasets. With RLS, each user only sees the data they are authorized to view, even when all records are stored in a single dataset.
Scenario
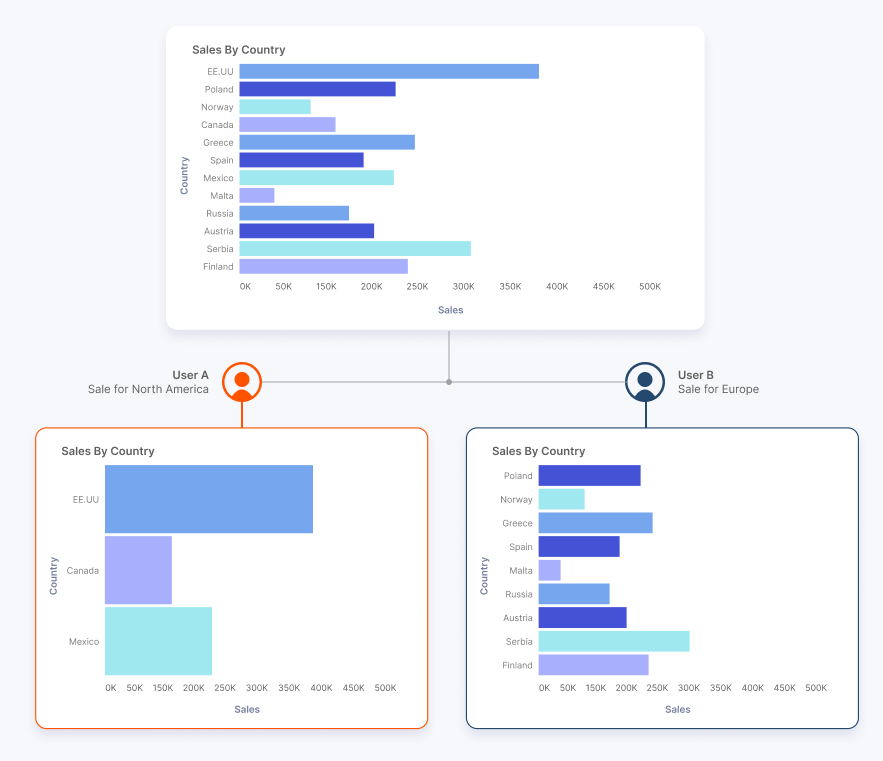
Your application, available to multiple tenants, embeds a sales chart for viewing by two users.
- User A: Should only see sales data for North America.
- User B: Should only see sales data for Europe.
With Record-Level Security, you can use a single dataset containing sales for all countries and all tenants, but each user will only see the data they are permitted to access.
Sales by Country and Tenant:
Shows a dataset with sales by country and tenant, and two users each seeing only their allowed country’s data in the embedded chart.
Note: RLS is never applied in "Composer Mode". All datasets, whether or not they have RLS security groups defined, are effectively "open" when you are logged in to Composer.
Configure Record-Level Security
In Qrvey, Record-Level Security is implemented as a filter that is embedded within the authentication/authorization token for the widget, called the qvToken. When you create this token, you specify a set of filters under a property called record_permissions. When the token is passed to the widget, these filters are automatically applied to all data shown in that widget, ensuring users only see the data they are permitted to access. For security, Qrvey recommends generating the qvToken in your back end (server-side) service so it cannot be tampered with by end users.
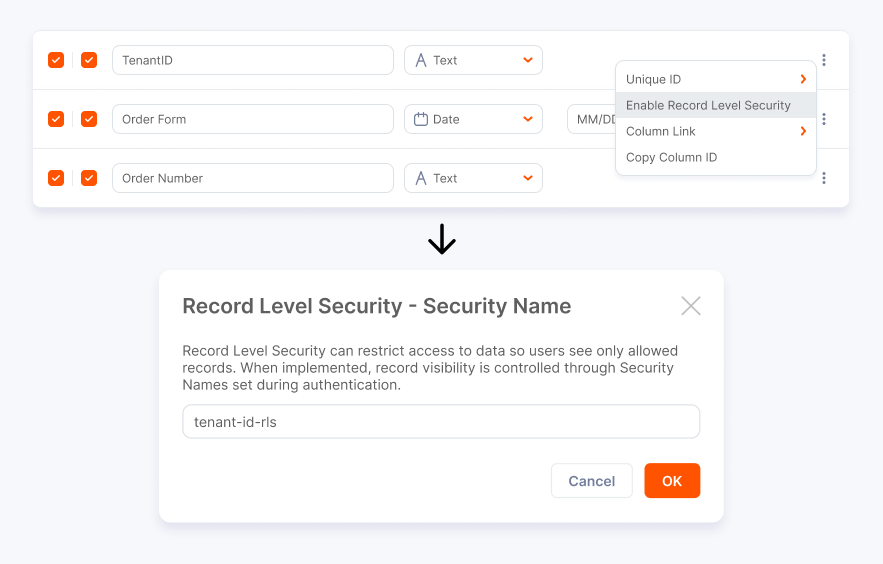
Step 1: Enable Record-Level Security on the Dataset
A data admin or builder enables Record-Level Security on the dataset in Qrvey Composer.
- You can enable RLS on one or more columns (for example,
country,tenant_id). - When enabling RLS, you must provide a security name for each column. This name will be used later to filter data for each user.
- After enabling RLS and selecting Apply Changes, the dataset is ready for RLS.
Enabling RLS on a dataset:
Qrvey Composer Dataset UI where a security column is being enabled and a security name is being set.
Step 2: Authentication and Authorization for Widgets
To enforce Record-Level Security when embedding widgets, you need to authenticate users and authorize their data access:
-
Create a security token (
qvToken):- In your application (the one embedding the widget), call the Qrvey Create Token API to generate a security token.
- Best Practice: Call this API from your backend for security reasons.
-
Pass the token to the front end:
- Send the generated token to your frontend.
- Attach the token to the widget’s JSON config using the
qvTokenparameter.
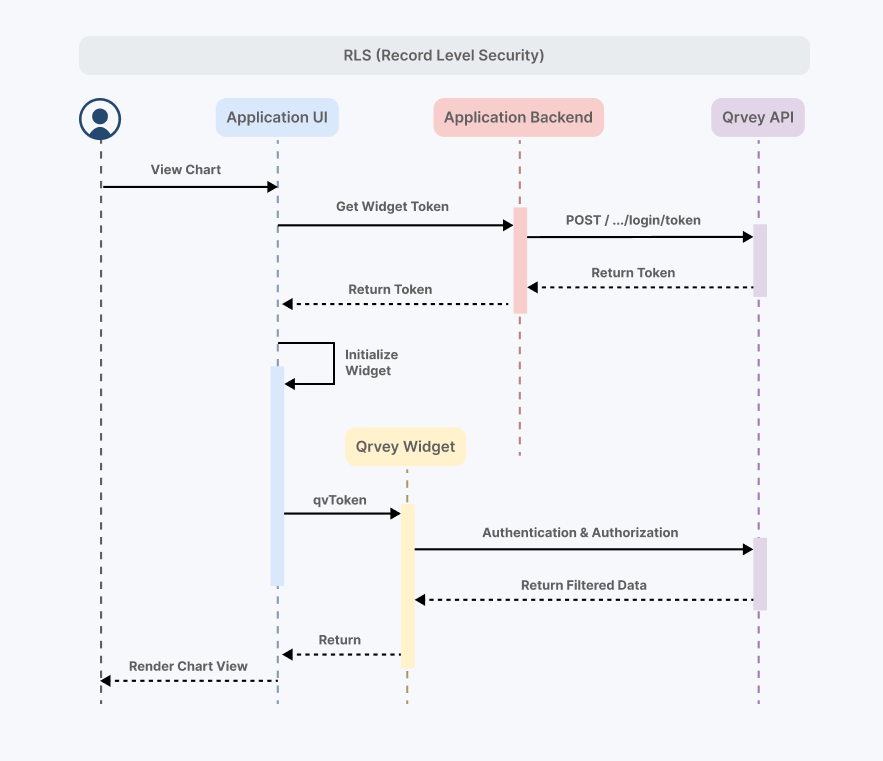
API Flow to generate a token:
Customer app frontend requests token from backend → Backend calls Qrvey API → Backend returns token to frontend → Frontend embeds widget with token → Qrvey widget backend validates token and filters data.
Record-Level Security Permissions Schema
The permissions parameter in the security token defines which records a user can access.
Attribute Definitions
-
permissions–Array<Object>– Required – Each object defines RLS permissions for a given dataset.-
dataset_id–String || Array<String>– Required – ID of dataset to apply RLS to. Use*to match all datasets. -
operator–String ("AND" || "OR")– Optional – Defaults toAND. Determines how to combinerecord_permissions. -
record_permissions–Array<Object>– Required – List of record filter objects specifying the permitted values and/or value ranges for each dataset column where an RLS security group is defined.-
security_name–String– Required – Name of the security group defined for the dataset column. -
validation_type–String– Optional – Determines how to evaluate the values. Defaults toEQUAL.
Options:
EQUAL,NOT_EQUAL,CONTAIN,NOT_CONTAIN,RANGE,NOT_RANGE,BETWEEN,
GREATER_THAN,GREATER_THAN_OR_EQUAL,LESS_THAN,LESS_THAN_OR_EQUAL,
START_WITH,NOT_START_WITH,END_WITH,NOT_END_WITH,IS_EMPTY,IS_NOT_EMPTY -
values–Array<String|Number|Object>– Required – List of permitted values.- For most validation types, provide an array of string or number values.
- For
RANGE,NOT_RANGE, orBETWEENvalidation types, use an object with only the relevant properties (gt,gte,lt, orlte) needed for your constraint. You do not need to specify all properties—just those that apply to your filter. - For the
EQUALvalidation type, you can use*to allow unrestricted access to all values.
-
group_value–String– Optional – For date columns only. Defaults toDAY.
Options:
SECOND,MINUTE,HOUR,DAY,WEEK,MONTH,QUARTER,YEAR, and so on.
-
-
Example: Generate and Use a Security Token with Record-Level Security Permissions
Node.JS Back-End sample for Generating a Token
- Tenant & Country filter
- Date range filter
//Works with Node.JS v18 or higher
const express = require('express');
const cors = require('cors');
const app = express();
const port = 3000;

const {
  API_KEY,
  DOMAIN,
  ORIGIN
} = process.env;

const corsOptions = {
  origin: ORIGIN, // Allow requests only from this origin
  methods: 'GET,POST', // Allowed HTTP methods
  credentials: true, // Allow sending cookies and authentication headers
  optionsSuccessStatus: 200 // Some legacy browsers (IE11, various SmartTVs) choke on 204
};

app.use(cors(corsOptions));

app.get('/api/get-jwt-token', async (req, res) => {
  const url = DOMAIN + '/devapi/v4/core/login/token';
  const config = {
    // ... Top-level of qvToken config like userId, appId, and so on This will filter all chartdata for dataset1 by tenantId=123 and country IN ("USA", "CANADA","MEXICO")
    "permissions": [
      {
        "dataset_id": "dataset1",
        "operator": "OR",
        "record_permissions": [
          {
            "security_name": "tenant-id-rls",
            "validation_type": "EQUAL",
            "values": [
                "123"
            ]
          },
          {
            "security_name": "country-rls",
            "validation_type": "EQUAL",
            "values": [
                "USA",
                "CANADA",
                "MEXICO"
            ]
          }
        ]
      }
    ]
  }
  const options = {
    method: 'POST',
    headers: {
      'Content-Type': 'application/json',
      Accept: 'application/json',
      'x-api-key': API_KEY
    },
    body: JSON.stringify(config)
  };
  try {
    const response = await fetch(url, options);
    const data = await response.json();
    console.log(data.token);
    res.json({ message: 'Function executed successfully', token: data.token });
  } catch (error) {
    console.error(error);
  }
});

app.listen(port, () => {
    console.log(`Node.js server listening at http://localhost:${port}`);
});
//Works with Node.JS v18 or higher
const express = require('express');
const cors = require('cors');
const app = express();
const port = 3000;

const {
  API_KEY,
  DOMAIN,
  ORIGIN
} = process.env;

const corsOptions = {
  origin: ORIGIN, // Allow requests only from this origin
  methods: 'GET,POST', // Allowed HTTP methods
  credentials: true, // Allow sending cookies and authentication headers
  optionsSuccessStatus: 200 // Some legacy browsers (IE11, various SmartTVs) choke on 204
};

app.use(cors(corsOptions));

app.get('/api/get-jwt-token', async (req, res) => {
  const url = DOMAIN + '/devapi/v4/core/login/token';
  const config = {
    // ... Top-level of qvToken config like userId, appId, and so on
    "permissions": [
      {
        "dataset_id": "dataset1",
        "operator": "AND",
        "record_permissions": [
          {
            "security_name": "MyDateSecurityName",
            "validation_type": "RANGE",
            "group_value": "month",
            "values": [
              {
                "gte": "Jun 2020",
                "lte": "Dec 2020"
              }
            ]
          },
          {
               "operator": "OR",
               "record_permissions": [
                  {
                     "security_name": "MyCountrySecurityName",
                     "validation_type": "CONTAIN",
                     "values": [
                        "ina",
                        "col"
                     ]
                  },
                  {
                     "security_name": "MyNumericSecurityName",
                     "validation_type": "RANGE",
                     "values": [
                        {
                           "gte": 1e6
                        }
                     ]
                  }
               ]
            }
        ]
      }
    ]
  }
  const options = {
    method: 'POST',
    headers: {
      'Content-Type': 'application/json',
      Accept: 'application/json',
      'x-api-key': API_KEY
    },
    body: JSON.stringify(config)
  };
  try {
    const response = await fetch(url, options);
    const data = await response.json();
    console.log(data);
    res.json({ message: 'Function executed successfully', token: data.token });
  } catch (error) {
    console.error(error);
  }
});

app.listen(port, () => {
    console.log(`Node.js server listening at http://localhost:${port}`);
});
Use the Token in Dashboard Widget Configuration
<html>
  <head></head>
  <body>
    <h2>The Dashboard</h2>
    <h3>Record level security usingQV Token</h3>
    <br/>
    <div id='widget-container'></div>

    <script>
      // A frontend call to your backend, which fetches & forwards the qvToken.
      async function fetchToken() {
        try {
          const response = await fetch('https://localhost:3000/api/get-jwt-token');
          const data = await response.json();
          console.log("RESPONSE:", data);
          return data.token;
        } catch(error) {
          console.log(error)
        }
      }

      // Injects widget with global settings.
      async function embedWidget() {
          let token = await fetchToken();
          let widgetContainer = document.querySelector("#widget-container");
          window["qrvey-dashboard-config"] = { // Setting global settings
              "domain": "DOMAIN",
              "qvToken": token,
              // ... additional Widget configs as needed like dashboardId, clientId, orgId, and so on
              };
          let dashboard = document.createElement("qrvey-dashboard");
          dashboard.setAttribute("settings", "qrvey-dashboard-config");
          widgetContainer.append(dashboard);
      }

      embedWidget();
    </script>
    <script type="module" src="https://demo.qrvey.com/qrvey-dashboard/qrvey-dashboard/qrvey-dashboard.esm.js"></script>
  </body>
</html>
Troubleshooting
Chart Shows "No data found"
If your chart displays a "No data found" message:
- Ensure that you are setting the security filters correctly in the
record_permissionsobject of the security token. - Each security column selected in the dataset must have a value defined in
record_permissions. - To make a column unrestricted, use
*as the value for that column. - Check for mismatches in your list of
security_namevalues. The names must exactly match those defined in your dataset security settings, or the filter will not work.
Chart Shows All Data (No Filtering)
If your chart is not filtering data and shows all records:
- Verify that security columns are enabled on the dataset in Qrvey Composer.
- Make sure you selected the Apply Changes button after configuring security columns.
- Check your security token: if you use
*for the values inrecord_permissions, the filter will allow all data for that column. Only use*if you intend to grant unrestricted access.
Tip: If you make changes and do not see them reflected in your embedded widgets, you might need to clear your browser cache and perform a hard reload to ensure the latest configuration is loaded.