
What’s New

Qrvey 9.0
Qrvey Version 9.0 is now available! This release introduces multi-platform hosting (Azure & AWS), a redesigned Dashboard, extensive widget customizations, and numerous features, enhancements, bug fixes, and performance improvements.
Learn More
Qrvey 8.8
Qrvey Version 8.8 (LTS) is now available to customers! This version supports FIPS for GovCloud and includes tons of bug fixes and performance improvements.
Learn More
Qrvey 8.7
Version 8.7 of the Qrvey platform is now available to customers! This version includes new features including area charts, the ability to pivot and export data, as well as numerous bug fixes and performance improvements.
Learn More
Qrvey 8.6
Version 8.6 of the Qrvey platform is now available to customers. This version includes several new feature enhancements and performance improvements.
Learn More
Required Update for 8.5.1
Attention 8.5.1 customers: for any 8.5.1 instance deployed prior to 08/05/2024, an update is required to ensure you are running the latest images.
Learn More
Qrvey 8.5
Version 8.5 (LTS) of the Qrvey platform is now available to customers. This version includes several new features and performance improvements.
Learn More
End-of-life Schedule
We've added a new article that lists the features and endpoints that have been scheduled for deprecation. All features and endpoints will be supported for (1) year after the release date of the LTS version that contains the alternative.
Learn More
Version: 9.0

Buckets

Bucketing is a feature that groups multiple data points into a single item, called a bucket, to simplify analysis.

Note: Bucketing is not available for all chart data types.

Create a Bucket

To create a bucket:

  1. Go to the desired chart builder or dataset > analyze and click the bucket icon in the upper-right toolbar.
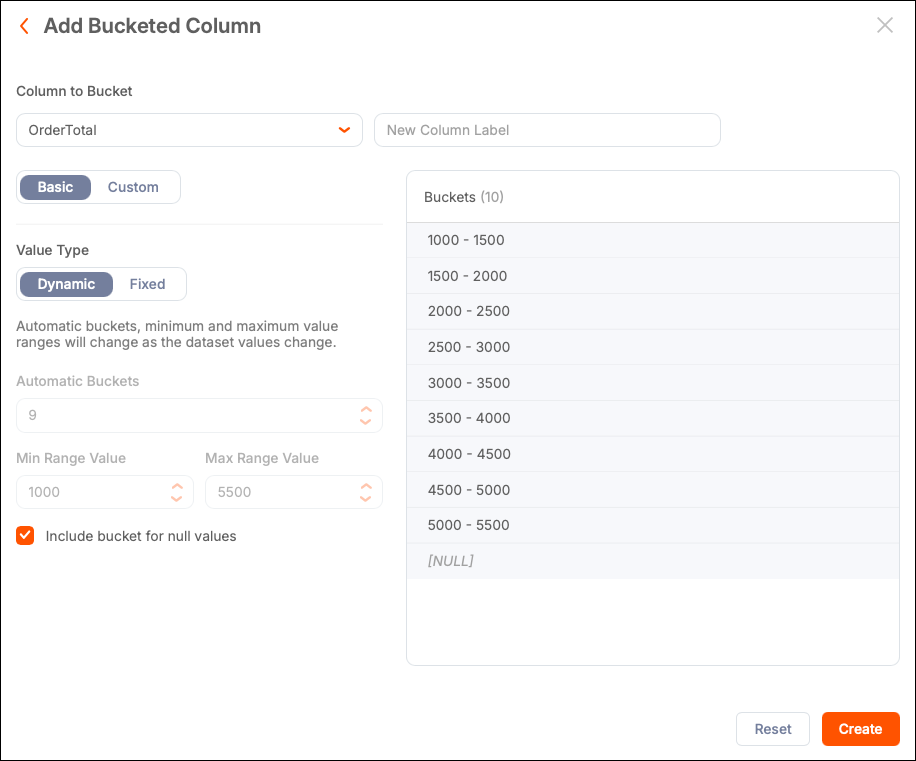
 1_buckets
  2. Click the orange Add Bucketed Column button. 2_buckets
  3. In the bucket editor:
    • Select a column to group into buckets.
    • Enter a label for your new bucketed column.
  4. Configure as desired for the column's data type. See below for details.
  5. Once satisfied, click Create.

The new bucketed column will be available for analysis throughout the application.

Manage Buckets

Bucketed columns are listed in the Buckets modal window. Each column has three icons to:

  • Duplicate: Create a copy of the bucketed column.
  • Edit: Modify the bucketed column.
  • Delete: Remove the bucketed column immediately.

Note: Deleting a bucketed column is irreversible.

Numeric Columns

For numeric columns, choose one of the following options:

  • Basic: Automatically manage buckets.
    • Dynamic: Buckets adjust as data changes.
    • Fixed: Specify the number of buckets, minimum, and maximum range values.
  • Custom: Manually create, label, adjust, add, or remove buckets.

Text Columns

For text columns:

  1. Enter a comma-separated list of bucket names and click Add Bucket.
  2. Assign values to buckets using checkboxes in the values list.
  3. Use the Unassigned Values As "Other" option to group unassigned values.
  4. Remove values or buckets using the button.

Date Columns

For date columns:

  1. Click + Add Custom Bucket.
  2. Label the bucket and set conditions to group data points.
  3. Use the Remove button to delete a bucket or drag handles to reorder them. 3_buckets For example, you can create buckets for specific date ranges, such as 1999, 2000–2010, and 2011–2019. Data points outside these ranges will be omitted unless catchall buckets are created. 4_buckets